Wednesday, December 6, 2017

Nonna's Pizzelles

I decided to make Italian Pizzelles to serve for dessert.  I haven't made them in over 20 years.  I got this recipe 
from a friend's Nonna (Italian for Grandma).
Her cookies are delicious. And because I'm now a "Nonna" I knew it was a good sign that these pizzelles
were going to be great:)

Here's the recipe:


3 large eggs
1 cup white sugar
1/2 cup butter melted then cooled
1 1/2  to 2 cups flour
2 tsp baking powder
Anise Oil or Vanilla to taste


Beat eggs and sugar together.
Add cooled melted butter a little at a time. Beat well.
Gradually add enough flour to make a very light dough.
If you want thicker pizzelles, add more flour.


You can substitute orange flavor or coconut rum instead of vanilla.
If you want to roll them for filling do it as soon as you take them out of the iron.


Let cool completely on a rack or tablecloth before packaging.

I have an old electric pizzelle iron that I wasn't sure exactly how to use. I didn't grease the iron enough for the first 2 cookies and they stuck and burned!

So, make sure you grease your iron well! I used a little margarine and then some oil to keep the plates greased.

I put small blobs of dough about the size of a ping-pong ball using 2 spoons.


The pizzelles cooked on the iron for about 45 to 50 seconds until lightly golden. I lifted them with a metal spatula and let them cool on wire racks.


I got 40 pizzelles from this recipe and they were wonderful!! Tony gave them his stamp of approval,
and that means a lot:)

Some interesting family history: here's my mother's pizzelle iron (made in Italy with her initials, CR - Rose Ciotti)
that she used her whole life.


I remember vividly sitting at the kitchen table, rolling out her pizzelle dough into small balls so she could stand at the stove the cook each one for about a minute on each side. I wish I had pictures of those moments:) Mom, I hope my pizzelles are as good as yours!

Saturday, November 4, 2017

Things I'm learning from my grandson

This past summer I became a Nonna to my sweet grandson, Lorenzo.  I am blessed to be able to spend some time with him and I'm amazed at the simple life lessons
that I'm learning every day.


1. Our needs are simple.  If you spend time with a baby, you know that we only really "need" a few things in life.  Lorenzo is not impressed with money, style, politics, fame or beauty.  He needs love, milk, and clean diapers.  Why do we complicate such a simple life?

2. Slow down.  There is no such thing as feeding a baby quickly.  It doesn't matter what I had planned, if he's hungry and it's "milk time" I need to sit down and savor this special time to bond with him while he drinks his milk.  Sometimes I get too busy and I really need to stop and sit down.

3. If you make a mess, clean it up!  I have many funny diaper stories to tell Lorenzo when he grows up.  But it doesn't matter how dirty the diaper is, all I need is a clean rag to wipe away all the mess.  Even though he is so little, I truly believe he likes to be clean and dry.  He appreciates my care.  It makes me thankful for all the people who care for me.

4. Smile and laugh.  He is starting to smile and laugh a lot.  I can't even identify what he is so amused at sometimes.  He seems to laugh while looking up at my living room ceiling!  He loves to be outside and look up at the sky (and the ceiling of my porch).  He is very content to lie there, smiling and laughing.  It makes me think about what I'm not looking at and smiling about.  I believe God's gifts are everywhere if we would just pay attention.

Thursday, October 19, 2017

Bring Your Herbs Inside!

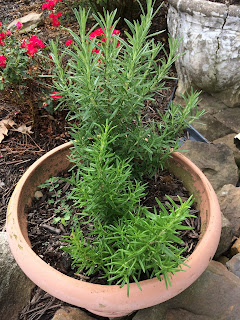
We use fresh Rosemary all year long for cooking.  Tony especially likes to infuse butter with garlic and rosemary for a filet mignon steak sauce.  It's wonderful!

I have 3 lovely rosemary plants in the garden.  Rosemary is an annual and is not hardy in my climate zone.
 I successfully kept them alive last winter in the house and I will do the same this year.  Here's how:

First I dug up the plants and shook off as much dirt as I could from the roots. This way I don't bring bug larvae into the house!!

Next I planted them in a box with fresh potting soil.  Here are my happy plants in my sun-filled office where they will thrive all winter!

Many herbs are perennials and will return next year on their own.  I know my chives, thyme, oregano and mint will greet me outside next spring after a long winter's nap.

oregano

mint


Wednesday, October 11, 2017

Homemade Vegetable Broth

I'm always looking for ways to cut out waste.  I compost most of my kitchen scraps from fruits and vegetables.  I recently found another way to use those scraps.

Here's how to make your own vegetable soup broth:

Put your vegetable scraps (carrot ends, cauliflower stalks, broccoli stalks, cabbage cores, celery ends, kale stalks, etc...) in a labeled bag in your freezer until you have a gallon ziploc bag full.


Place the contents in a crock pot and fill with water.  Cook on low for 8 to 10 hours until the broth is a rich dark color.


Strain and pour the liquid into containers and freeze until you need some nutritious broth for soup!

Friday, September 15, 2017

Roasted Red Peppers

We use Roasted Red Peppers in many dishes.  They are wonderful on top of a pizza, added to an omelet or sauteed vegetables.  Tony seasons a bowl of sliced roasted red peppers with olive oil, balsamic vinegar and spices as a lovely addition to a meat and cheese antipasto.  Slices of roasted pepper are wonderful on a roast beef sandwich or
a caprese panini!

You can buy a jar easily, but with 
garden harvest season upon us...

It's easy to roast your own Red Peppers!

Here's what we do:

Put the red peppers (any kind, Bell, Sweet, or Hot) directly on your grill top with a low/medium flame under them.  Turn them every few minutes until they get charred on all sides.


They look like this when they're done.


Rinse off all the skin under running water and you have beautiful, fresh, roasted peppers!  Slice them and enjoy.
Bon appetit!

Saturday, August 19, 2017

Maintain Your Bagless Vacuum

Do you have a "Bagless" Vacuum?
That means that you need to clean your filter and maintain other parts to keep it running well.
here's what I do regularly.

1.  If the beater brush isn't spinning well, the belt may need to be replaced.  Just locate the screws that hold the cover in place, open it up and find the rubber belt.  My 10-year-old vacuum is still working hard with a new belt in place!

2.  Don't forget to remove all the hair and strings that get wrapped around your brush!

3.  This is the MOST IMPORTANT!!  After every 3 or 4 full dirt cups, I thorough clean the foam sponge and plastic dirt cups.  Once the foam sponge gets clogged with dirt the vacuum won't really "suck."  I rinse every piece in my sink and let them air dry before the next vacuuming.


One of my best yard sale finds is a small Bissell bagless vacuum I bought for $8.  The seller insisted that, even though it was brand new, it didn't suck up any dirt.  I plugged it in and heard that the motor was running strong and the brush was turning well.  I bought it, took it home, and within minutes found a huge hair/dirt ball stuck in the hose.  I cleaned the foam filter and dirt cup, and discovered that this beauty works just fine!  5 years later, it's going strong!

Monday, July 31, 2017

July 2017 Blooms

Here's the bloom report for this month!

Rosemary

Mint

Hydrangeas (finally!)

Daisies

More Hydrangeas

Look at this one!

Potentilla "Mango Tango"

Coreopsis

Lavender

Lacecap Hydrangea - This hasn't bloomed in 10 years!!

Coneflower (Echinacea)

Penstemmon

Astilbes

Obedient Plant

**Since most of my hydrangeas are blooming on the side of my house where I can't see them often, I cut some and put them in water by my kitchen door.  I'm enjoying these beauties all day long!

Tuesday, July 18, 2017

Get Organized - Part 2

If you need some practical help for getting organized, here are a few easy tips!

1.  Use Magazine Holders, Small Baskets, and Shower Caddies to corral small items like water bottles in the kitchen cupboard, hair styling tools in the bathroom, socks and underwear in your closet.  I was at Aldi today and I snapped these photos of so many organizers!!  Yes, I take pictures of baskets and shelves all the time:)  I can't resist!


2.  Use Ice Cube Trays, Egg Holders, and Bins in drawers to keep things tidy.  I use an egg holder to organize my jewelry in a dresser drawer!


3.  Put Baskets on high shelves with lightweight items to use that space efficiently.  I keep pajamas and off-season clothes in these high baskets in my closet.


Here's a link to an excellent list of Good Housekeeping's 
101 Best Organizing Tips.  Enjoy!

101 Best Organizing Tips

Saturday, July 8, 2017

Get Organized - Part 1

If you're bogged down with stuff, then maybe it's time to 
get your space organized.  Here are a few quick tips to 
help you start!

1. Reclaim Dead Space - Think about using the space you have most efficiently.  Hang items on hooks, put up shelves, reclaim corners, etc.


Look at how my friend used a small corner space in her bathroom to store all these necessities!!


2. Think Vertical - Use towel bars to hang items in kitchen cupboards.  Hang pots on walls.  Get grocery bags in a holder on the wall.  Hang jewelry on command hooks!


3.  Institute the "One In, One Out" Rule - You'll never get ahead of clutter if you constantly add to your stuff and never purge.  If you buy a new dress, donate and old one.  If you get a new pair of shoes...you get the idea.  Get into the habit of donating unused items to charity.  It's the right thing to do!

Stay tuned for Part 2!

Thursday, June 29, 2017

June 2017

Here are my blooms this month!

Veronica

Ornamental Lilies


Red Hot Pokers


Bachelor Buttons


Blanket Flowers

Climbing Roses

Love in a Mist

Lemon Drop

Coral Bells

Roses!!


Blanket Knock-Out Roses

Penstemon (Bees LOVE these flowers!)

Favorite 2024 Blooms

  I'm thinking about my favorites from this year's blooms.  I wanted to post them all here so I can look at them during the cold dre...